Showing posts with label Get your craft on. Show all posts

February 8, 2012

"Love is for the birds" DIY Valentine's Day Gift Tag

By popular demand (and thanks for all your kind requests!), I've made the "Love is for the birds" Valentine's Day gift tags a free printable.  


Click here to download your DIY printable copy.  


And don't forget the recipe to create your own birdseed ornament.  I've modified the post a bit to ensure you're aware that the cakes MUST DRY COMPLETELY before packaging.  Otherwise, you'll get a moldy mess.  


Trust me, I speak from experience.

Photobucket

January 31, 2012

Get your craft on: DIY birdseed ornament tutorial


For Valentine's Day teacher gifts, we're doing heart-shaped birdseed ornaments.  Popular for bird-themed wedding favors, too, this was an easy DIY project that the Gravy Kids enjoyed.

For the heart shapes, I used a donut baking tin I found at Target.  You can use cookie cutters, too, but shelling out the $9.99 was worth it over digging through my basement looking for the box of cookie cutters.  The payment of convenience.


Here's the recipe:
3/4 cup all-purpose flour
1/2 cup water
3 tablespoons corn syrup or honey
1 packet unflavored gelatin
4 cups birdseed
Cooking spray


1. In a large bowl, combine flour, water, corn syrup (or honey), and gelatin.  
2.Add birdseed and mix well.  


 **MODIFIED INSTRUCTIONS BELOW** 
3.  Scoop into greased molds and let dry for several hours before removing from mold.  
4.  Let ornaments dry overnight on wax paper.  


The result should be a distinctly hard ornament the next day.  Any squishiness means that the ornament is not completely dry and may mold if packaged up too soon.


Alternatively, you could use cookie cutters by putting wax paper on top of a cookie sheet and filling the greased cookie cutters with seeds.  Just be sure to insert pieces of straw to leave a hole to tie the string through after the ornament dries.  A mini-bundt pan would probably work well, too.


We wrapped the heart birdseed ornaments into a plastic bag, topped it off with a "love is for the birds" gift tag and voila!  Instant gift.


Photobucket

November 29, 2011

Get your craft on: DIY crayons

I've read many articles about making your own crayons from broken ones using cookie molds, so I thought Wavey would find it a fun holiday project for kid-gifts. 

So here's the rub: We didn't have enough organically-derived broken crayons, so we broke a apart a box of new ones...and what an UNHOLY MESS it was to peel the wrappers off of them. 

Did you know generic crayons affix their wrappers with the same glue probably used to hold rocket ships together in space?  Yep, now you know, and I have the wax under my nails to prove it.


We melted the crayons in the oven at 275-degrees for about 15 minutes and let them cool completely before popping them out of the mold.  Success!


Photobucket

May 19, 2011

Free DIY Printable: "Don't do that thing"


Inspired by a line I heard in a hilarious TV commercial, sometimes it's just better to just tell it like it is:


I'm all for *real* inspirational quotes, but this line was just too good to let pass by.  Click here to download yours!

Photobucket

May 5, 2011

Free DIY printable: Mother's Day gift tags

 
You know those cute little plants found in the floral aisle of grocery stores?  I think they make great little gifts.


Click here to download free, DIY printable circle gift tags from Good Gravy! The design is double-sided so you can affix each side to a popsicle stick (or use a clothespin like I did because for the life of me I can't find that stinkin' bag of popsicle sticks I bought last week).


Best of all? The gift tags aren't necessarily just for moms...you can use them for other women in your life who you recognize on Mother's Day, like aunts, teachers, grandmothers and more.  Enjoy!

  Photobucket

April 26, 2011

DIY free printable: "It takes courage"

I like this quote from e.e. cummings:


I found an inexpensive 5x7" frame, threw the quote into a quick design layout and printed it.


 Like this quote, too?  Click here to download your very own free DIY print.

Photobucket

April 11, 2011

Save, Give and Spend Jars

At nearly six years old, we decided it's time for Waverly to understand earning and spending money.


Each week, if she completes her "chores" (i.e., bringing her dish from the table to the sink), she'll earn a small allowance delivered in coins.  With that allowance, she can choose to divide it into SAVE, GIVE and SPEND jars.


We explained the concept of GIVE to her and she decided that when the jar was full, she'd use the money to buy groceries for our local food pantry.  I found it important at her age to offer tangible giving options to so she can see immediate results of her charity.  Buying a book and donating it to the library was another tangible option. 


Let's face it: we could all use SAVE, GIVE and SPEND jars no matter what our age.  Get started and click here to download a FREE printable sharing these jar tags.  Happy coin collecting!

Photobucket

April 5, 2011

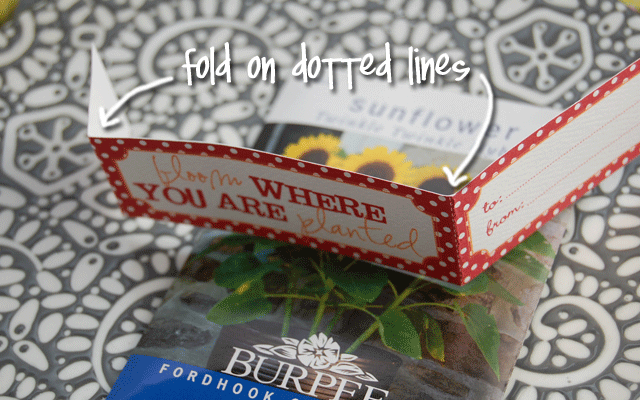
DIY seed packet wrap


Now that my stinkin' hard cast is off my arm, it's time to get back to crafting, and let's kick off spring with DIY Free Printable Seed Packet Wraps!


You'll need:
  • Free printable printed on heavy paper{click here to download}
  • Scissors
  • Glue or tape (I used double-sided tape)
  • Seed packets
Once you print and cut your wraps, fold along the white dotted lines:

Turn to back and glue or tape on small tab.  Don't forget to write in your "To/From."


It'll probably take you more time perusing the seed aisle and dreaming of spring gardens than it will be to complete this craft. 


This packet idea would be great for school teacher appreciation gifts, wouldn't it?! 

Photobucket

March 1, 2011

For the birds

A great client of mine asked me to design a sign for a baby boy shower she was hosting and offering birdseed favors to guests. 


I'm all for functional favors, and her idea to hang them from a potted tree branch was so clever.  Love this idea!

Photobucket

February 23, 2011

Free DIY Printable: St. Patrick's Day gift tags

Oh, come on now.  Just because you may or may not be Irish doesn't mean you can't spread the luck around a little. 


Personally, I'm half-Irish but will celebrate the holiday in whole.  And you should, too, with my latest Good Gravy! free DIY printable St. Patrick's Day gift tags in the polka dotted motif that's popular these days. 

Click here to download, and go forth to find yourself some [Yucky] Charms cereal and green food dye.


Want more St. Patrick's day printable goodies?  Check out the Good Gravy! pillow box designed last year.

Photobucket

January 24, 2011

DIY Valentine's Day gift tags


Gearing up for Valentine's Day?  Click here to download my Good Gravy! DIY printable gift tags! 

Please hold your applause for my efforts to get this out more than three days before the holiday.


And one Valentine friend of mine is going to get a jar of my beloved cereal marshmallows, as seen below.  Now, that's true love.


Photobucket

December 1, 2010

DIY holiday pillows

I have an insane amount of wool felt leftover from my DIY looped holiday wreath, so when I came across pre-made brown pillows, I couldn't resist this no-sew idea.


Here's what you'll need:

+ Tell your husband you're going to Target just to buy toothpaste but then come out of the store a few bucks lighter because you found these great brown pillows at $3.50 each.

+ Iron-on adhesive paper (I used Heat N Bond)

+ Wool felt, or other fabric is fine

+ Glue stick, scissors

- - - - - - - - - - - - - - --

First, iron on the adhesive paper to the back side of your fabric.  Then, you can draw your pattern right onto it:

For lettering, I printed out the word "merry" in reverse and then glued it to the top of the adhesive paper so I could cut around it:

Cut out all your shapes (as seen below), remove the adhesive paper and then iron directly onto your pillow.  I skipped the part of showing you the ironing because if you're unclear on how to iron, you probably shouldn't be using scissors.


 Instant festivity in under an hour.

Photobucket

November 8, 2010

Get loopy: DIY Wool Felt Holiday Wreath

Call it a 'Christmas miracle' because I actually crafted something AHEAD of the season.  Presenting my DIY Handmade Wool Felt Looped Holiday Wreath:

To give you an idea of its lack of complexity, know that standing in the cutting line at the fabric store on a Saturday morning two weeks prior to Thanksgiving probably took longer than the actual execution of this project. 

Here's what you'll need:
+  3-inch x half-inch strips of multi-colored wool felt (if using three colors like me, plan for approximately 120 strips of each color).  I like wool felt because it has a vintage look about it.
+  8-inch foam circle
+  Hot glue gun
+  Satin ribbon


Glue the ends of your strips together to form loops.  There will be approximately five kabillion of these little loops when you're done.  Rest assured, you'll need nearly all of them.  

After all your loops are made, it's time to glue them to your wreath.  I started at the center and then filled in toward the inside and outside of the circle.

When it's all filled in, tie a colored satin ribbon (I used chocolate brown) to hang and you're done!

I'm thinking this might be a nice little gift to giveaway later this week.  Check back for details!  :)
Photobucket